Beautiful handmade Bora Bora Engagement Ring Box
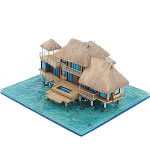
Here is my recent addition to my engagement ring boxes collection, I made at first half of this year. I custom made it for Jonathan from Australia. He wanted his ring box to look like the Nui Resort and Spa…